Service Manager
This is the latest version of the help for Ivanti Service Manager 2018. If you cannot find some of the features described in the help, you may be using an older version of the application. To upgrade the application, click here.To view the help for the latest version of Service Manager, click here
Creating a Self Service Mobile Role
If you are using a version of HEAT prior to Release 2016.1 you may need to create the Self Service Mobile role using the following procedures. For versions of Service Manager beginning with HEAT Release 2016.1, the Self Service Mobile role is available, but will need to be assigned to users.
•Creating the Self Service Mobile Role
•Editing the Incident.WebSelfService.New Form
•Editing the Incident.WebSelfService.Edit Form
•Assigning a Role to the New Self Service User Interface
Creating the Self Service Mobile Role
The Self Service Mobile role can access the Self Service Mobile user interface.
Create the Self Service Mobile role by following these steps. After you create the role, edit the WebSelfService.New and WebSelfService.Edit Incident forms to ensure that they allow the appropriate views.
1.From the Configuration Console, click Configure > Users and Permissions > Roles and Permissions.
2.Find the SelfService role in the Role Name column and click Clone in the Action column.
3.In the Clone Role dialog box, enter SelfServiceMobile (with no spaces).
Check the spelling. After you enter and save the name, you cannot change it.
4.Click the newly created SelfServiceMobile role to go to the Role Details page.
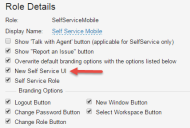
5.Check New Self Service UI. This provides access to the Self Service Mobile user interface.
Enabling the Self Service UI check box will ignore any settings configured in the top-level tabs for that role. Use Self Service Mobile UI customizations to configure mobile options. See Customizing the Responsive User Interface for more information.
Checking New Self Service UI
6.Click Save.
You can add this new role to any group, or assign it to any users who need to access the Self Service Mobile user interface.
Editing the Incident.WebSelfService.New Form
1.From the Configuration Console, click Configure > Business Objects to open the Business Objects workspace.
2.Open the Incident business object.
3.Click Forms from the toolbar, then click Incident (Incident.WebSelfService.New) to open the form.
4.Click the Summary field to select it.
5.From the Control Properties tab, set the Width parameter to 21.
6.Click the Description field to select it.
7.From the Control Properties tab, set the Width parameter to 21.
8.Click Save.
Editing the Incident.WebSelfService.Edit Form
1.From the Configuration Console, click Configure > Business Objects to open the Business Objects workspace.
2.Open the Incident business object.
3.Click Forms from the toolbar, then click Incident (Incident.WebSelfService.Edit) to open the form.
4.Click the Activity History field and then click Delete to delete the field from the form.
5.From the left pane, click Other, and then drag Related Object List on to the form.
6.Ensure that the Related Object control is in its own row, and drag it to move it if needed.
7.Select or set the following properties for the related object list from the Control Properties tab:
| Name | Value |
|---|---|
| Height | 2 em |
| Label Pos | On the top |
|
Style |
Default |
| Tab Index | 1 |
| Width | 35 em |
8.Click Flex Settings to open the Related Objects List dialog box and modify the following settings:
| Name | Setting |
|---|---|
| Operations | Check Multi-Select. (Uncheck all other options.) |
| Show Items as | Select Shrink to fit from the drop-down list. |
|
Types |
Select Journal#Notes |
| Type Configuration: [Journal#Notes] | |
| Show as |
Select Custom. Then enter the following code: <div> <p>
</p> </div> |
| Item Click | Select Open Form. |
| View Form | Select Journal Notes (Journal Notes). |
9.Click Save from the dialog box.
10.Click Save.
Assigning a Role to the New Self Service User Interface
Use this procedure to assign a role other than the Self Service role to be able to access the Self Service Mobile user interface.
1.From the Configuration Console, click Configure > Users and Permissions > Roles and Permissions.
Select any role. The system displays the Role Details workspace.
Check New Self Service UI. All users of this role can now access the Self Service Mobile UI.
Assigning the New Self Service UI option to a role may cause unwanted behavior. We recommend that you create a specific SelfServiceMobile user role and assign access only to that role.
Was this article useful?
The topic was:
Inaccurate
Incomplete
Not what I expected
Other
Copyright © 2018, Ivanti. All rights reserved.
